
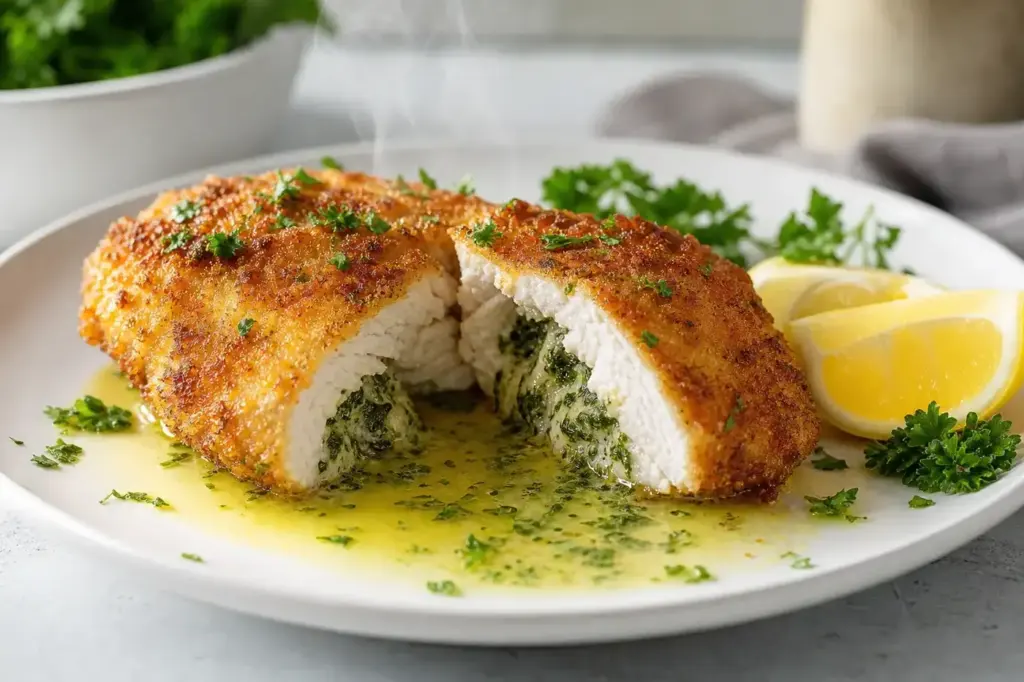
Chicken Kiev is one of Eastern Europe’s most recognizable dishes, equally at home on restaurant tables in Moscow and Paris. Whether you’re cooking it at home or ordering it in a Moscow dining room, understanding the technique makes all the difference: the chicken must be thin, the butter frozen, and the sealing tight to contain the filling.
This guide walks you through how to make Chicken Kiev at home, from mixing the herb butter to the final sear and bake. The result is a golden, crispy exterior giving way to juicy chicken and a burst of garlicky, herb-infused butter.
Quick answer: Make a compound butter with garlic and parsley, freeze it solid, pound chicken breasts thin, wrap each around a butter piece, seal tightly, bread it, then pan-fry briefly and finish in the oven. Total time: 60–90 minutes (including chilling). Moderate cost.
At a Glance
| Type | Dishes |
|---|---|
| Local name | Котлета по-киевски |
| Origin | According to Russian historian William Pokhlyobkin, the recipe originated in early 20th-century St Petersburg, where an anonymous chef created kotlety Novomikhailovskie for the Merchants' Club. During the Soviet era, it took the name kotleta po-kiyevski (котлета по-киевски), literally 'cutlet in Kiev style'. Since the 18th century, Russian chefs adopted French haute cuisine techniques, furthered by French chefs such as Marie-Antoine Carême and Urbain Dubois hired by Russian nobility, and high-quality meat cuts like various cutlets became widespread in the 19th century, with original dishes developing in Russia at that time. |
| Servings | 2–3 servings (4 pieces) |
| Total time | 60–90 minutes total (30 minutes prep and chilling, 30–40 minutes for filling and breading, 15–25 minutes cooking) |
| Difficulty | Medium |
History and Story of Chicken Kiev (Котлета по-киевски)
French chefs such as Antonin Carême and Urbain Dubois, hired to serve the Russian nobility, brought rolling and stuffing techniques (ballotines, dodines, and galantines). In the 19th century, breaded chops became very fashionable among Russian gastronomers, and recipes similar to French quenelles but with herb butter appeared in early Russian cookbooks. According to Pokhlyobkin, the dish disappeared after World War I and the Russian Revolution, but Soviet chefs revived it for a 1940s banquet welcoming Ukrainian diplomats back to Kiev, renaming it kotlety po-Kievski.
Ingredients
- 4 boneless, skinless chicken breasts (about 180–220 g each)
- 100–120 g unsalted butter, softened
- 2 garlic cloves, minced
- 3 tablespoons fresh parsley, chopped
- 1 lemon, for zest and juice
- 150 ml all-purpose flour
- 3 eggs, beaten
- 150–200 g panko breadcrumbs
- Oil for frying (neutral vegetable or canola oil)
- Salt and pepper to taste
How Chicken Kiev (Котлета по-киевски) Is Made
Step 1: Make the compound butter
Mix softened butter with minced garlic, chopped fresh parsley, lemon zest, lemon juice, salt, and pepper in a bowl until smooth. The texture should resemble a thick paste. Spread the mixture onto a piece of parchment paper or plastic wrap, shaping it into a small log or bar. Refrigerate for at least 30 minutes until completely firm, then cut lengthwise into 4 equal pieces. The butter must be fully frozen when it enters the chicken.
Tip: Room-temperature butter will not hold its shape during pounding and cooking. If your butter becomes too soft, return it to the freezer for another 10 minutes.
Step 2: Prepare and pound the chicken
Place each chicken breast between two sheets of plastic wrap or parchment paper. Using a meat mallet, rolling pin, or empty can, pound the chicken evenly until it is about 0.5 cm thick. Work from the center outward, being gentle at the edges. The goal is a thin, even cutlet without tears. If a piece does tear, lay it flat carefully; small tears often seal during cooking.
Tip: Pounding on a plastic-wrapped surface keeps the mallet clean and the counter dry. Do not skip this step—the thickness is essential for proper cooking and rolling.
Step 3: Stuff and wrap the chicken
Lay the pounded chicken breast on a clean surface with the smooth side facing down. Season lightly with salt and pepper. Place one frozen butter piece at the center of the chicken. Fold the two short sides over the butter first, then roll the chicken tightly from bottom to top, keeping the butter completely enclosed. The roll should be tight and compact, like a small burrito. Seam should face down.
Tip: If the chicken does not stay sealed or butter threatens to escape, secure with toothpicks or use a tiny bit of egg-and-flour paste as glue along the seam.
Step 4: Chill to firm up
Wrap each roll tightly in plastic wrap or baking paper, twisting the ends to create tension. Place in the freezer for 15–30 minutes until the outside is firm to the touch but not rock solid. This firming makes breading easier and reduces the risk of butter leaking during cooking.
Tip: Do not freeze solid; the chicken becomes difficult to coat evenly. Thirty minutes is usually enough for the outside to set without the inside becoming hard.
Step 5: Set up the breading station
Place three shallow bowls or plates in a row. In the first, add flour mixed with a pinch of salt and pepper. In the second, lightly whisk beaten eggs. In the third, pour panko breadcrumbs. Have a clean plate ready to receive the breaded pieces.
Tip: Work in order: flour first, then egg, then breadcrumbs. Use one hand for dry coatings and the other for wet so you do not create clumps.
Step 6: Bread the chicken
Unwrap a chilled roll. Lightly dust all over with flour, shaking off excess. Dip into the beaten egg, turning to coat all sides and allowing excess to drip off. Finally, press firmly into the panko breadcrumbs, patting so the coating adheres evenly. Pay special attention to the ends and seams. Place on the prepared plate and repeat with remaining rolls.
Tip: For extra crispiness, you can apply a second coat of egg and breadcrumbs if desired. The coating should completely cover the chicken with no gaps.
Step 7: Cook: sear and finish
Heat oil in a heavy skillet or shallow frying pan over medium heat until shimmering (about 1–2 cm depth). Gently place the breaded rolls into the hot oil and cook 3–4 minutes per side until golden brown. Do not crowd the pan. Preheat your oven to 190°C. Once all rolls are seared, transfer them to a baking sheet and bake for 10–15 minutes until cooked through. The internal temperature should reach 75°C when measured in the thickest part.
Tip: Low-to-medium heat prevents the breadcrumb coating from burning before the chicken is cooked inside. If the coating browns too quickly, lower the heat slightly.
Variants
- Veal Kiev: made with veal cutlets instead of chicken, following the same technique
- Kiev with mixed herbs: using dill, chives, and tarragon in addition to or instead of parsley
- Kiev with cheese: some modern versions add a slice of soft cheese or shredded cheese to the butter filling
- Baked Kiev: for a lighter version, the breaded rolls can be baked in the oven instead of fried, though the coating will be less crispy
- Kiev with different proteins: occasionally made with turkey or pork cutlets in home cooking, though these are not traditional
Common Mistakes to Avoid
- Skipping the pounding step or not pounding thin enough. If the chicken is thick, it will not cook through before the coating burns, and the roll cannot seal properly around the butter.
- Using warm or soft butter. Warm butter melts and leaks out during breading. Freeze it solid and keep it frozen until the moment you wrap the chicken.
- Not sealing the seam tightly. Loose seams allow butter to escape during cooking, creating a mess and losing flavor. Press and fold the edges firmly, and use toothpicks if needed.
- Breading too far in advance. If you bread the chicken more than a few hours before cooking, the breadcrumb coating absorbs moisture and becomes soggy instead of crispy. Bread shortly before cooking or store in the refrigerator uncovered.
- Cooking too fast at too high a temperature. High heat burns the coating before the chicken cooks through. Medium heat is essential; it allows the outside to turn golden while the inside remains juicy.
- Not refrigerating after breading. Freshly breaded rolls should sit in the fridge for at least 20 minutes so the coating sets and stays intact during frying.
How to Order and Eat It
Serve immediately while hot. The presentation is half the appeal: when you cut into the golden, crispy exterior with a sharp knife, the hot herb butter flows out and creates a sauce around the tender chicken. Eat with a fork and knife so you can cut cleanly and catch the butter. In Moscow restaurants, Chicken Kiev is traditionally served with boiled or mashed potatoes and a side vegetable or simple salad. Pair with a light sauce if desired—lemon juice, a mushroom sauce, or a simple pan sauce made from the drippings.
To order: Котлета по-киевски, пожалуйста [Kotleta po-kiyevski, pozhaluysta]
Diet and Allergens
- Contains gluten
- Contains eggs
- Contains dairy
Where to Try Chicken Kiev (Котлета по-киевски)
 Korchma Ukrainian and Slavic
Main image: AI-generated illustration. It may not show the place exactly as it looks.
Moscow Vibes Tips
- The butter-to-chicken ratio is crucial. Too much butter and it will leak out; too little and the finished dish will taste dry. Aim for about 25–30 g of butter per breast. This is why freezing the butter into a specific shape matters—you can see exactly how much you are using.
- If the breaded chicken is refrigerated for more than a few hours, the coating can absorb moisture and lose its crispness. Either bread and cook within 2–4 hours, or freeze the breaded rolls uncooked in a freezer-safe bag for up to a week. If frozen, add 5–10 minutes to the cooking time and do not thaw before frying.
- Listen for the sizzle when you place the chicken in the hot oil. If there is no sizzle, the oil is not hot enough and the coating will absorb oil instead of crisping. If it spatters aggressively, lower the heat slightly and cover the pan loosely with a splatter screen.
- The most common mistake is overcooking the chicken during the finishing bake. Ten to fifteen minutes is usually enough; 20 minutes risks drying it out. Insert a meat thermometer into the thickest part to check: 75°C is the target.
- If you are nervous about butter leaking, use a meat thermometer inserted horizontally through the seam to check doneness without cutting into it. This keeps the roll intact and lets the butter stay hot inside.
Where to Find Chicken Kiev (Котлета по-киевски) in Moscow
Related guides
 10 Best Places to Try Russian Food in Moscow: Classics and Canteens
Main image: AI-generated illustration. It may not show the place exactly as it looks.
Browse more: All Food & Drink · All Other
FAQ
Can I make Chicken Kiev ahead of time?
Yes, you can prepare it through the breading step and refrigerate it for 4–6 hours, or freeze it for up to a week. Cook from chilled or frozen (add 5–10 minutes if frozen). Do not hold it breaded and uncooked for more than a few hours at room temperature or the coating becomes soggy.
What if the butter leaks out during cooking?
This usually happens if the chicken was not sealed tightly or the filling was not frozen solid. Prevent it by freezing the butter completely, pounding the chicken very thin, and folding all seams tightly inward. If it happens, the dish is still edible—you simply have a fried chicken cutlet with a butter sauce on the plate instead of inside.
Can I bake it instead of frying?
Technically yes, but traditional Chicken Kiev is fried for its distinctive crispy, golden exterior. Baking alone produces a softer crust. A hybrid method—brief pan-frying followed by oven finishing—gives the best result of both: crisp exterior and fully cooked interior.
Is Chicken Kiev Russian or Ukrainian?
The dish is associated with both Russian and Ukrainian cuisines, and the place of origin is listed as the Russian Empire, though the history is not well documented and various sources make different claims about its origin.
What herbs should I use in the butter?
Fresh parsley is the classic choice and most common. Dill, chives, and tarragon can be added or substituted. Garlic is essential. Avoid strong dried herbs as they can overpower the delicate chicken.
How do I know when it is cooked through?
Use a meat thermometer: the thickest part should reach 75°C. Alternatively, pierce the thickest part with a small knife or skewer; the juices should run clear. Do not cut the roll itself to check, as this releases the butter.
Can I use chicken thighs instead of breasts?
Chicken breasts are traditional because they are lean and can be pounded very thin. Thighs are thicker and fattier, making them harder to pound evenly and to seal around the butter. Stick to skinless, boneless breasts for best results.
What should I serve with Chicken Kiev?
In Moscow and Eastern Europe, it is traditionally served with boiled or mashed potatoes and a simple vegetable like green beans, peas, or roasted carrots. A light salad or lemon wedges work well. The melted butter inside the chicken is rich enough that you do not need a heavy sauce.
Discover More of Moscow with Our Travel Tips
Get practical Moscow travel tips, new destination guides and useful updates on attractions, opening hours and prices. Plan your visit with clear, helpful information delivered to your inbox.
Moscow Vibes is a one-person project. A coffee keeps it going
Looking for more on this? Blini, Vladivostok: How to Make Russian Yeast Pancakes (Russia Vibes)

Take this guide with you
Get a free PDF of this guide to print or read offline: key facts, tips and a map link on a few clean pages.
Report an issue on this page
Paying for your trip: please read
Payments and bookings between Russia and many other countries are currently restricted. In practice, cards issued in the EU, the UK, the US and several other countries often cannot be used in Russia, Russian cards usually cannot be used abroad, and some booking platforms, airlines and payment providers limit or pause their services for Russia. The situation changes frequently.
We do not give legal or financial advice, and this site does not encourage anyone to break any rule that applies to them. Whatever you plan, you are responsible for following the laws and regulations that apply to you, including those of your country of residence and citizenship.
Many travelers still organise their stay without problems. It is worth asking your bank or payment provider what is currently possible, contacting hotels, tour operators and carriers directly about the payment methods they accept, and checking which services are open to customers from your country. Clarify payment, cancellation and refund terms before you commit to a booking, and keep your plans flexible.
Partner links on this site may not be available in every country, and prices, availability and rules in our guides can differ from what you see when you book.
How we research and update our guides
About this guide: AI assistance and accuracy
This guide is created with the help of AI and is based on official sources where available. Mistakes can still happen. Opening hours, prices, rules and other details are given to the best of our knowledge as of the date shown and can change without notice. It offers general recommendations only, not professional, legal or travel advice. Please confirm important details with the official source before you travel; you are responsible for your own plans and decisions.
* Affiliate link: as an Amazon Associate we earn from qualifying purchases at no extra cost to you.